Moving always feels overwhelming, especially when you think about packing up every room and keeping track of what goes where. Most people worry about lost items or damaged boxes, but the real headache often comes after you arrive and cannot find essentials. A well-labeled moving box can save you up to 30 percent of your unpacking time, yet most movers skip proper labeling and end up wasting hours searching later. There is a smarter way that turns chaos into order right from the start.
| Key Point | Explanation |
|---|---|
| 1. Gather Quality Labeling Supplies | Assemble markers, tape, and stickers before packing. Ensure durability for effective labeling through the move. |
| 2. Categorize Items Systematically | Sort items by room or purpose to streamline packing and unpacking processes. This saves time and reduces stress. |
| 3. Establish a Consistent Labeling System | Use clear, detailed labels with color coding and box numbering for easy identification and tracking of your belongings. |
| 4. Label Boxes Clearly and Accurately | Ensure labels are legible and informative, specifying contents and handling instructions. This aids in efficient unpacking. |
| 5. Verify Labels Before Sealing Boxes | Conduct a final check of labels to confirm accuracy and clarity. This minimizes confusion during the moving process. |
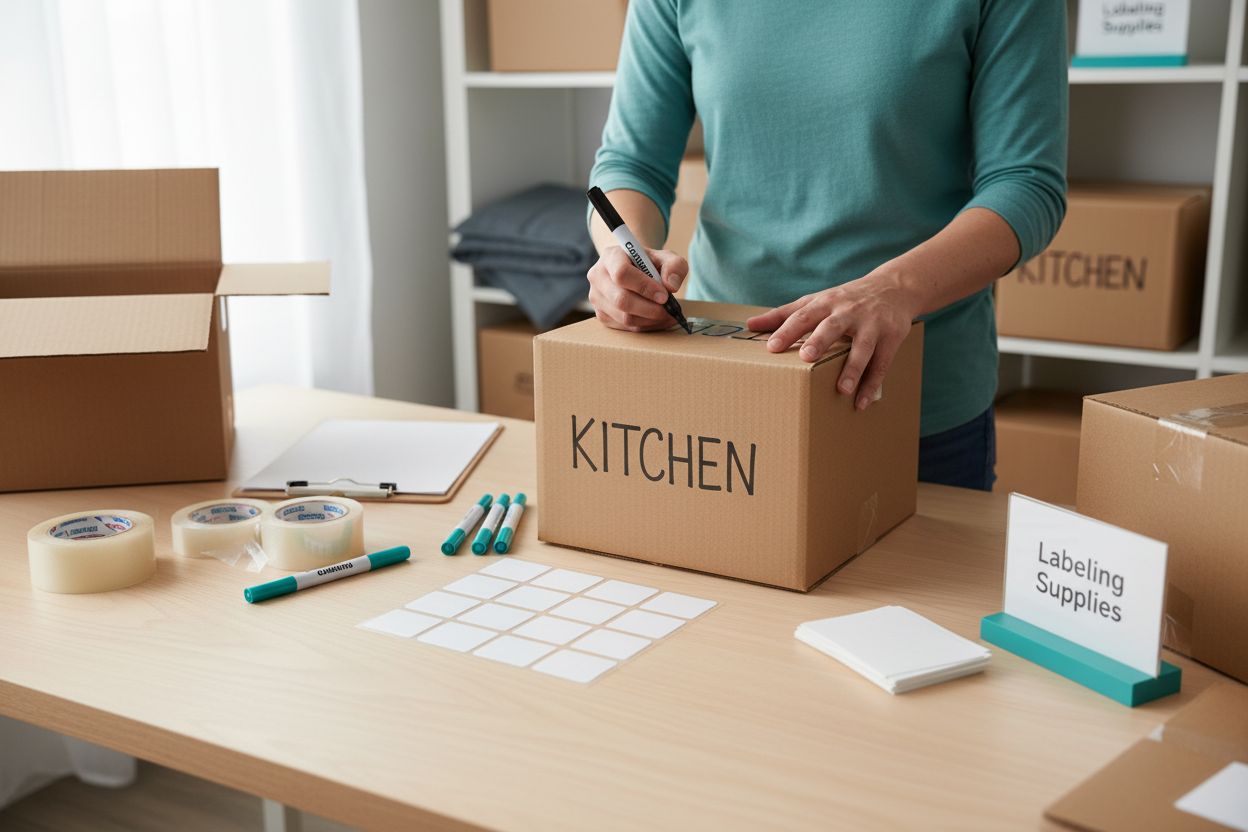
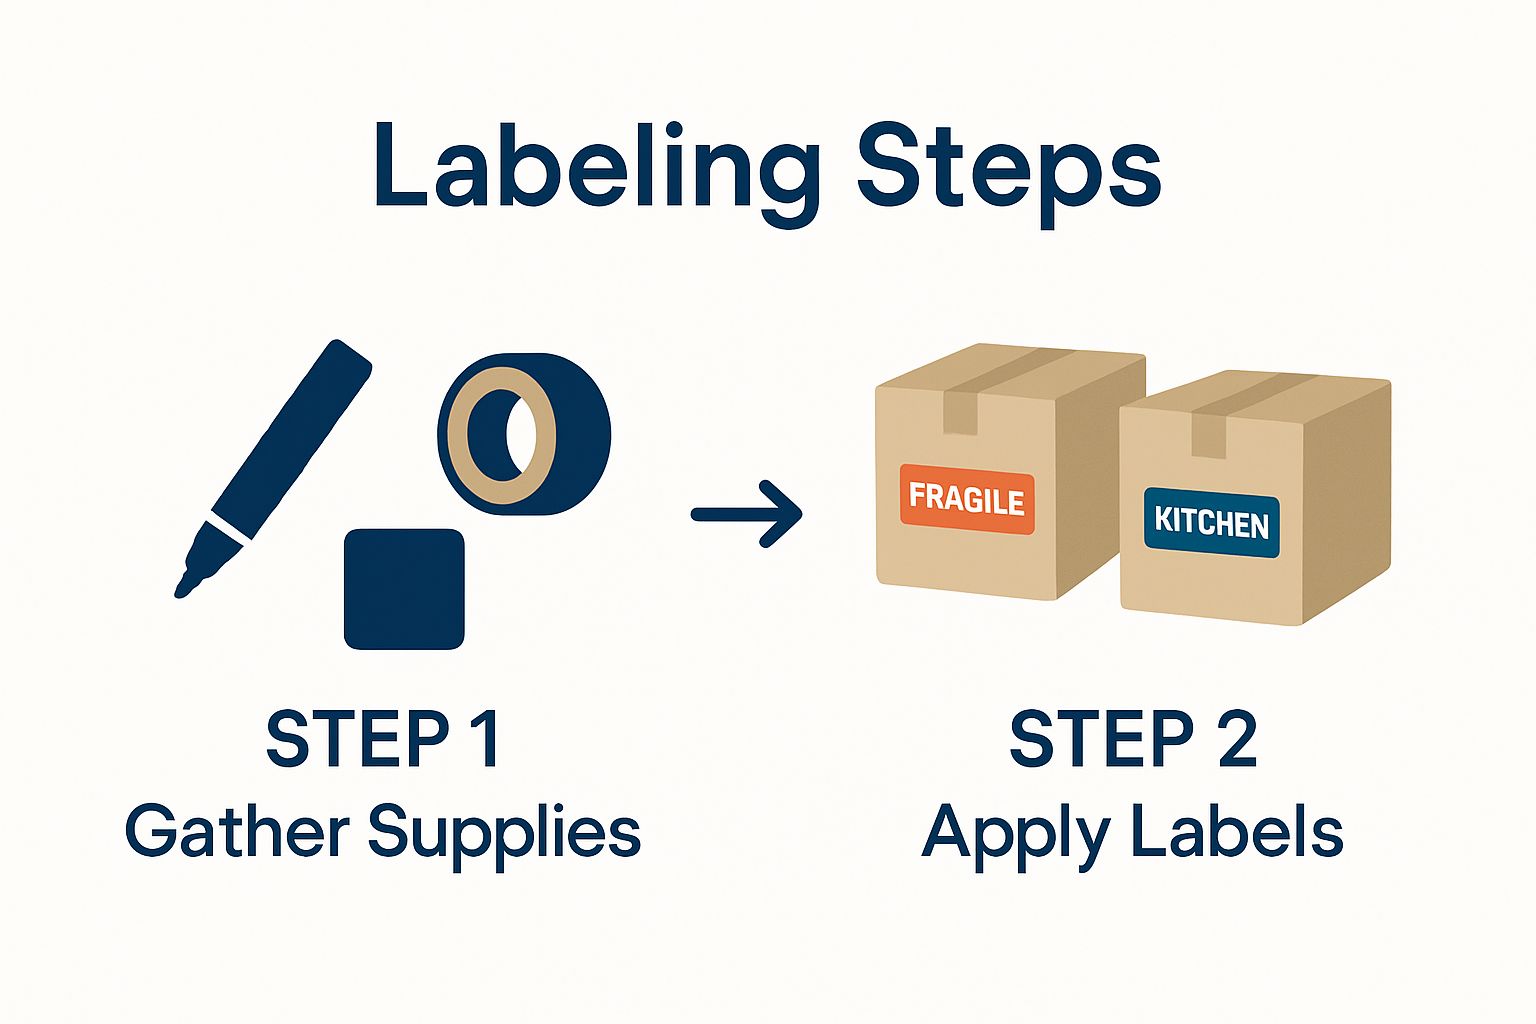
Preparing for a successful move begins with collecting the right labeling materials. Proper preparation eliminates confusion and reduces stress during the packing and unpacking processes. Before you start boxing up your belongings, you’ll want to assemble a comprehensive labeling kit that will make your moving experience smoother and more organized.
Essential Labeling Supplies
Your labeling toolkit should include high-quality, durable materials that can withstand the rigors of moving. Start with permanent markers in multiple colors, which allow you to create a color-coded system for different rooms or categories of items. Select markers with thick, bold tips that write clearly on various surfaces like cardboard, plastic, and tape. Choose markers that are waterproof and fade-resistant to ensure your labels remain legible throughout the moving process.
In addition to markers, you’ll need sturdy packing tape and color-coded label stickers. Professional-grade packing tape ensures your boxes remain sealed during transit, while colored stickers help you quickly identify box contents and destinations. Consider purchasing a tape dispenser to make sealing boxes faster and more efficient. Some movers prefer using pre-printed moving labels that include spaces for detailed information like contents, room destination, and handling instructions.
For those seeking extra organization, invest in a labeling system kit that includes standardized labels, color-coded dots, and comprehensive tracking sheets. These kits often come with inventory lists that help you track every box and its contents. Clipboard or notebook can be useful for maintaining a master inventory list, allowing you to track which boxes have been packed, labeled, and loaded.
Practical tip: Purchase slightly more supplies than you think you’ll need. Running out of labels or markers midway through packing can disrupt your workflow and create unnecessary stress. Having backup supplies ensures you can complete your labeling process smoothly and efficiently.
By gathering these materials beforehand, you set the foundation for a well-organized move. Your carefully curated labeling toolkit will transform a potentially chaotic moving experience into a structured, manageable process.
To help you prepare for packing, here is a table summarizing the recommended labeling materials along with their specific uses.
| Material | Purpose | Special Notes |
|---|---|---|
| Permanent markers (multi-color) | Write clear, color-coded labels on boxes | Waterproof and fade-resistant; thick bold tips |
| Sturdy packing tape | Securely seal moving boxes | Use a tape dispenser for efficiency |
| Color-coded label stickers | Visually distinguish boxes by room or item type | Assign colors to rooms/categories |
| Pre-printed moving labels | Streamline detailed labeling (contents, room, handling) | Includes spaces for extra information |
| Labeling system kit | Provide standardized labels, color dots, inventory sheets | Helps with master inventory tracking |
| Clipboard or notebook | Maintain a written master inventory list | Allows for easy tracking during entire move |
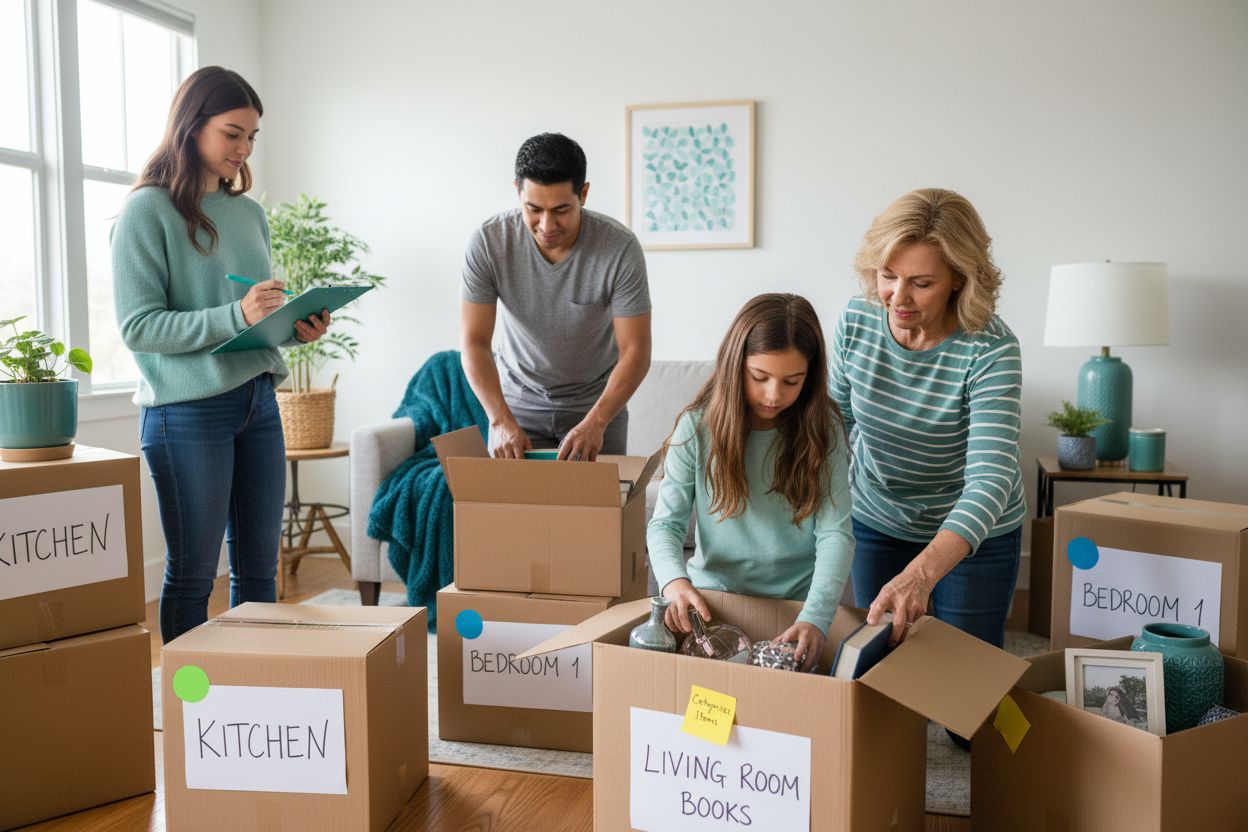
Categorizing your belongings is a critical step that transforms a chaotic move into a strategic, well-organized transition. This process involves systematically sorting items based on their destination room or specific purpose, creating a clear roadmap for packing and unpacking. By implementing a thoughtful categorization strategy, you’ll save significant time and reduce stress during your move.
Begin by walking through each room in your current living space and mentally divide your possessions into distinct categories. Fragile items, electronics, books, clothing, and kitchen supplies should each receive special attention. Use a systematic approach where you focus on one room at a time, preventing overwhelming feelings and ensuring comprehensive coverage. Professional movers recommend creating a preliminary sorting system that distinguishes between items that will be packed immediately, items that require special handling, and objects that will be transported separately.
Color-Coded Categorization Strategy
Implement a color-coded system to streamline your categorization process. Assign specific colors to different rooms or item types using your colored markers or stickers from your previously gathered labeling materials. For example, blue might represent bedroom items, green for kitchen supplies, red for fragile items, and yellow for important documents. This visual method allows for quick identification and helps family members or movers understand the organization instantly.
Consider the unique characteristics of different item categories. Delicate items like glassware, artwork, and electronics require extra padding and careful labeling indicating “FRAGILE” and “HANDLE WITH CARE”. Valuable or sentimental items might need personal transportation rather than being packed with general household goods. Create a separate staging area for items that require special attention or will travel with you directly.
As you categorize, create a master inventory list that tracks each box, its contents, and its designated room. This documentation serves multiple purposes: it helps you track your belongings, assists movers in proper placement, and provides a reference point if any items are misplaced during the move. Digital tools like spreadsheet apps can be helpful for maintaining this inventory, allowing you to update and access your list from multiple devices.
Remember that effective categorization is about more than just sorting. It’s about creating a logical system that reduces stress and increases efficiency. By the end of this step, you should have a clear understanding of what you’re moving, where each item belongs, and how it will be packed and transported. Your meticulously categorized items are now ready for the next phase of your moving journey.
Developing a consistent labeling system is the cornerstone of an organized move, transforming potential chaos into a streamlined process. Your labeling approach should be clear, comprehensive, and easily understood by anyone who might handle your boxes. This systematic method will significantly reduce confusion and potential mishaps during packing, transportation, and unpacking.
Comprehensive Labeling Details
Each box should include multiple pieces of critical information. Start with the destination room, which helps movers and yourself quickly identify where the box belongs in your new space. Write this information prominently on at least two sides of the box, ensuring visibility regardless of box orientation. Next, add a brief contents description that provides a quick overview of what’s inside. This doesn’t mean listing every single item, but rather a general category like “Kitchen Dishes” or “Master Bedroom Linens”.
Incorporate a numbering system that tracks each box within your overall move. For instance, you might use a format like “Box 3 of 25” to help you quickly verify that all boxes have been transported and nothing has been left behind. This numerical tracking becomes invaluable during unpacking, allowing you to prioritize and confirm the arrival of all your belongings.
Prioritize handling instructions for boxes containing fragile or sensitive items. Use bold, clear markings like “FRAGILE”, “HANDLE WITH CARE”, or “THIS SIDE UP” to communicate special requirements. Consider using bright, distinctive stickers or markers that stand out from standard labeling to ensure these instructions are not overlooked. For boxes with electronics, artwork, or delicate items, these clear instructions can prevent potential damage during the moving process.
Color coding adds another layer of organization to your labeling system. Assign specific colors to different rooms or categories of items. Blue might represent bedroom items, green for kitchen supplies, and red for fragile objects. This visual system allows for quick identification and helps family members or professional movers understand your organizational structure at a glance.
Finally, create a master inventory list that corresponds with your box labels. This digital or physical document should track each box’s number, contents, destination room, and any special handling instructions. Having this comprehensive reference ensures you can quickly locate specific items and verify that everything has arrived safely. Your labeling system is complete when each box tells a clear story: where it came from, where it’s going, what’s inside, and how it should be handled.
By investing time in this detailed approach, you’re setting the stage for a smooth, stress-free moving experience.
Labeling each box with precision transforms a potentially chaotic moving experience into a smooth, organized transition. This critical step requires attention to detail and a strategic approach that communicates essential information at a glance. When done correctly, your labels become a comprehensive navigation system for your belongings, guiding movers and helping you quickly locate items in your new space.
Begin by selecting a clear, legible writing surface on each box. Choose the largest, most visible side and write in large, bold letters that can be read from several feet away. Your goal is to create labels that are immediately comprehensible, even in low light or from a distance. If you’ve chosen the right moving boxes, you’ll have smooth surfaces ideal for clear labeling.
Labeling Technique and Content
Each box label should include several key pieces of information. Start with the destination room, written prominently and clearly. Instead of generic terms, be specific: write “Master Bedroom Closet” rather than just “Bedroom”. Next, add a brief contents description that provides context without overwhelming detail. For instance, “Winter Clothing” or “Kitchen Cooking Utensils” gives immediate insight into the box’s contents.
Prioritize directional instructions for boxes containing fragile items. Use bright, attention-grabbing markers to write “FRAGILE”, “HANDLE WITH CARE”, or “THIS SIDE UP” in large letters. These critical annotations help prevent potential damage during handling and transportation. Consider using red or bright orange markers for these important notes to ensure they stand out from standard labeling.
Implement your numbering system consistently across all boxes. Mark each box with a sequential number and total box count, such as “Box 5 of 25”. This tracking method allows you to quickly verify that all boxes have been loaded, transported, and unloaded. Your master inventory list should correspond directly with these numbered labels, creating a foolproof tracking system.
Remember that good labeling is about more than just writing information. It’s about creating a clear, logical system that reduces stress and increases efficiency. By the end of this step, each box should tell a story: its origin, destination, contents, and any special handling requirements. This meticulous approach transforms a potentially overwhelming moving process into a structured, manageable experience. Your carefully labeled boxes are now ready for the next phase of their journey.
Before sealing your moving boxes, a comprehensive verification process becomes your final defense against potential moving day confusion. This critical step transforms your careful preparation into a foolproof system that minimizes the risk of misplaced or mishandled items. Think of this stage as your personal quality control checkpoint, where attention to detail can save significant time and stress during unpacking.
Systematic Verification Process
Begin by conducting a methodical review of each box’s label. Double-check that your destination room, contents description, and special handling instructions are clearly legible and accurately represent the items inside. Use a fresh perspective by stepping back and viewing labels from different angles and distances. What might seem clear when you’re inches away might be difficult to read from across a room or on a moving truck.
Compare your physical boxes against your master inventory list, ensuring that each box is numbered correctly and corresponds precisely with your tracking system. Look for any inconsistencies or potential errors in labeling. If you notice any discrepancies, now is the time to correct them before the box is sealed and potentially transported. Pay special attention to boxes containing fragile or valuable items, verifying that “FRAGILE” or “HANDLE WITH CARE” labels are prominently displayed on multiple sides.
Consider creating a quick photographic record of your labeled boxes. Using your smartphone to take clear pictures of each box’s label provides an additional layer of documentation. These images can serve as a backup reference if your written inventory gets misplaced and offer visual confirmation of your careful preparation. This digital documentation can be especially helpful for insurance purposes or if you need to track specific items during a complex move.
As you verify, confirm that labels are securely attached and won’t easily fall off during transit. If you’re using sticker labels, press them firmly onto the box surface. For handwritten labels, ensure the marker ink is completely dry and won’t smudge. Test the durability of your labels by gently running your hand over them to check for any potential wear or potential removal.
The final step in your verification process is a comprehensive walkthrough. Move through the space where you’ve packed your boxes, reviewing each one as if you were a professional mover seeing them for the first time. Ask yourself: Would a stranger understand exactly where this box belongs and how to handle it? Your goal is complete clarity and precision. By investing these final moments of careful review, you’re setting the stage for a smooth, organized moving experience that minimizes potential errors and maximizes efficiency.
Use this table as a quick-reference checklist when verifying your moving box labels before sealing, to ensure your labeling system is both accurate and durable.
| Verification Step | What to Check | Why It Matters |
|---|---|---|
| Legibility of Labels | Are all details readable from a distance? | Ensures movers can easily identify each box |
| Accuracy of Information | Does description match actual contents? | Prevents confusion and misplaced items |
| Room Destination Marked | Is the destination room clearly specified? | Aids efficient unloading and placement |
| Handling Instructions Present | Are fragile/important items clearly labeled? | Reduces risk of damage |
| Correspondence with Master Inventory | Does box number match your inventory list? | Simplifies tracking and retrieval |
| Durability of Label Materials | Are stickers/tape secure and ink dry? | Prevents loss or smudging during transit |
| Photographic Documentation (optional) | Have you taken a clear photo of each box label? | Provides a digital backup and reference |
Are you feeling overwhelmed by the details of labeling and organizing every box as you prepare for your big move? Even with a solid labeling system, it is easy to worry about lost items, confusing labels, or a chaotic unpacking experience. Stress-free moves are possible with the right team by your side. At US Pro Logistics, we turn your meticulous labeling and planning into a smooth, well-coordinated relocation. Our professionals are equipped to handle fragile items, track inventory, and ensure each box goes precisely where it belongs.

Choose confidence and clarity for your move today. Trust US Pro Logistics for streamlined residential moves, secure storage, and transparent service from packing to delivery. Ready to move with peace of mind? Request your free quote now and experience moving support designed for your needs. The sooner you reach out, the earlier we can help you organize every step for a truly stress-free transition.
To create a color-coded labeling system, assign specific colors to different rooms or item types, such as blue for bedroom items and green for kitchen supplies. Use colored markers or stickers to clearly identify each box’s destination at a glance.
Each box label should include the destination room, a brief contents description, and any special handling instructions like “FRAGILE”. Make sure these details are clearly written on multiple sides of the box for easy visibility.
To ensure your labels stay intact, use durable materials for labeling, like waterproof markers or sturdy stickers. Press labels firmly onto the boxes and check their durability before loading to prevent them from falling off during transit.
Before sealing your boxes, review each label for legibility and accuracy, comparing them against your master inventory list. Ensure that correct room names and box numbers are marked clearly, correcting any errors before closing the boxes.
Yes, documenting the contents with a master inventory list is highly recommended. Track each box’s number and contents to streamline the unpacking process and locate items quickly in your new home.
A consistent labeling system reduces stress by providing clear, understandable information for movers and yourself. By using visible labels with detailed instructions, you can save time and avoid confusion during both the packing and unpacking processes.
USDOT 3664256 This number is required for any company that operates commercial vehicles in interstate commerce (across state lines). It helps identify and track the safety performance and compliance of transportation companies.
MC 1268070 This number is specifically for companies involved in the transportation of goods or passengers for hire across state lines. It’s necessary for carriers operating in the moving industry and ensures they are authorized to operate as interstate carriers.